Enhancing Outdoor Asset Value: High-ROI Implementation of the Paver Patio

Source:https://villagegreenlandscapes.com

Imagine stepping out into your backyard on a gorgeous summer evening, ready to fire up the grill, only to find yourself sinking into a patchy, waterlogged mud pit. Or worse, you look down at your existing poured-concrete backyard slab and see a massive, jagged structural crack snaking its way directly toward your home’s foundation. It is an eyesore, a tripping hazard, and a massive hit to your property’s overall curb value.

In my ten-plus years of engineering outdoor living spaces, I have demolished countless cracked concrete pads. Homeowners often choose poured concrete because it seems fast and cheap upfront.

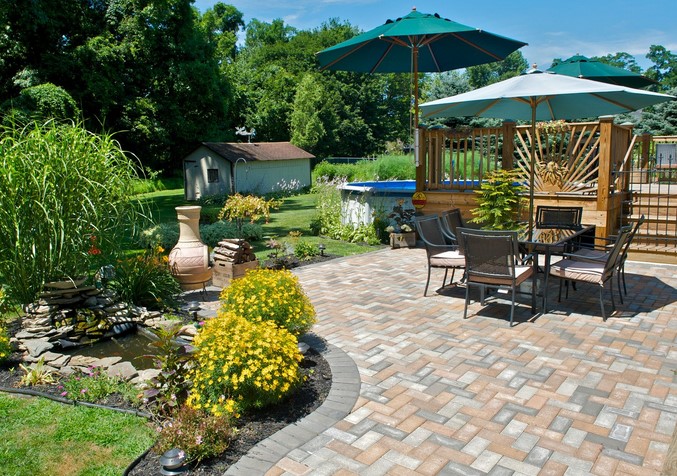
However, if you want a true, high-yield investment that completely alters your property’s square footage usability, a structurally engineered paver patio is the undisputed champion. A well-executed paver living space routinely recovers over 70% to 80% of its cost during a property appraisal. Let’s pull back the curtain on the soil mechanics, technical aggregate layers, and step-by-step physics needed to build an outdoor asset that lasts a lifetime.

The Physics of Flexibility: Why Interlocking Units Outperform Concrete

To understand why a paver patio is a superior investment, we have to look at how earth moves. Poured concrete is brittle; it relies on rigid strength. When the ground shifts due to moisture fluctuations, tree root intrusion, or freezing winter temperatures, a solid concrete slab cannot bend. It forces a crack to relieve the pressure.

The Segmented Movement Advantage

An interlocking paver system operates on a completely different engineering principle: flexible articulation. Because your patio surface is comprised of individual, dense concrete or natural stone blocks tightly knit together by specialized sand, the entire system behaves like a heavy, flexible fabric.

Analogi: The Chainmail vs. Plate Armor Blueprint

Think of a poured concrete pad like a rigid piece of medieval steel chest plate armor. If a giant force hits it or the body underneath twists, the steel will bend permanently or fracture open. A paver patio, on the other hand, is like a beautifully tailored suit of chainmail. It is woven from thousands of independent links. When the ground shifts or freezes underneath, the individual blocks micro-adjust independently, distributing the stress across the entire system without a single unit cracking.

Technical Specifications: The Sub-Surface Architecture

Here is an honest field insight that amateur design blogs love to ignore: a gorgeous patio is entirely an illusion. The actual pavers you walk on represent only 20% of the project’s structural integrity. The other 80% is the hidden, multi-layered foundation buried right beneath your lawn.

+-----------------------------------------------------------------------+
|                    THE PAVER PATIO BASE HIERARCHY                     |
+---------------------------+-------------------------------------------+
| Interlocking Pavers       | Concrete, clay, or stone finish units     |
+---------------------------+-------------------------------------------+
| Polymeric Sand Jointing   | Locks units laterally, blocks weeds/ants  |
|                           |                                           |
+---------------------------+-------------------------------------------+
| Bedding Sand (1-Inch)     | Coarse concrete sand for final leveling   |
+---------------------------+-------------------------------------------+
| Road Base (4 to 6 Inches) | Crushed angular gravel, densely compacted |
+---------------------------+-------------------------------------------+
| Geotextile Fabric         | Stabilizes subgrade, prevents soil mixing |
+---------------------------+-------------------------------------------+

1. Excavation Depth and Soil Subgrade

You cannot just scrape away the grass and drop your stone blocks down. You must excavate deep enough to accommodate your structural layers. For a standard residential foot-traffic patio, you need a minimum of 4 to 6 inches of compacted aggregate base, plus 1 inch of bedding sand, plus the thickness of the paver itself (usually 2 and 3/8 inches). This means you will be digging down roughly 8 to 9 inches into the earth.

2. The Angular Aggregate Base Layer

Your base material should never be rounded pea gravel or clean river stone. You must use an irregular, crushed structural aggregate like 3/4-inch minus road base (dense-grade aggregate containing both crushed rock and stone dust). When run over by a heavy gas-powered mechanical plate compactor, these sharp, angular stone shards lock tightly together like jagged puzzle pieces, creating an incredibly rigid, load-bearing plateau that still allows sub-surface water to drain away freely.

Step-by-Step Blueprint for a Flawless DIY Installation

Ready to build a high-ROI outdoor asset? Grab your safety gear, clear out your working grid, and execute this precise contractor workflow:

Step 1: Establish the Slope and Drainage Plan

Never build a patio perfectly flat. If you do, rain will pool in the center, destroying your joints and rotting your stone faces. You must integrate a structural drainage slope of a 1-inch drop for every 8 linear feet of distance, always sloped away from your home’s foundation. Use mason lines and a line level tied to wooden stakes to map this slope gradient precisely across your entire working footprint.

Step 2: Lay Down the Geotextile Barrier

Once your raw dirt subgrade is excavated and thoroughly packed down, line the entire pit with a professional-grade non-woven geotextile fabric. This fabric behaves like a one-way filtration valve. It stops your heavy crushed stone base from sinking down and mixing with the soft native clay mud over time, while still letting underground groundwater pass through cleanly.

Step 3: Screeding the Bedding Sand

Shovel your 4-to-6-inch gravel base in 2-inch layers, running your mechanical compactor over each layer at least three times. Once your base is rock-hard, lay down two parallel 1-inch exterior conduit pipes to act as tracks. Dump a layer of coarse, uncompacted concrete sand across the tracks, and drag a straight 2×4 wooden board across the pipes. This technique, called screeding, leaves you with a perfectly smooth, uncompacted 1-inch sand bed ready to accept your paving stones.

            [ SCREEDING TOOL LAYOUT ]
    ========================================
     [ 2x4 Screed Board ] ->  ======|======
                              |     |     |
     [ 1-Inch Pipe Tracks ] -> (O)   |    (O)
    ----------------------------------------
     [ Rock-Hard Compacted Gravel Base Layer ]

Step 4: The Clicking Installation Click

Start along your longest straight edge (usually the house wall) and lay your pavers down directly onto the sand bed. Always lay them from the top of the patio—never step directly onto your freshly screeded sand. Place each block straight down, clicking it snugly against its neighbor. Use a rubber mallet to gently settle units that sit a fraction high.

The Pitfalls that Blindside Amateur Builders

The Edge Restraint Catastrophe

The most devastating failure on a DIY paver patio happens along the outermost border. When you step on the edge of an un-anchored patio, your body weight pushes the outside stones horizontally into the soft garden dirt, causing the entire field layout to slowly separate, slip, and buckle apart within twelve months. You must install heavy-duty industrial plastic or aluminum edge restraints along the entire open perimeter. Secure these edging tracks deep into your gravel base using 10-inch steel landscape spikes spaced every 12 inches to lock your patio laterally forever.

  • Say No to Play Sand: When it comes time to fill the narrow joints between your pavers, never use cheap play sand or builder’s sand from a local sandbox kit. It will wash away during the very first rainstorm, inviting weeds to sprout and ants to colonize your layout. Always use a premium polymeric sand—a specialized sand blend packed with water-activated polymer binders. Once swept into the joints and lightly misted with a garden hose, the polymers cure into an elastic, rubbery grout that seals the joints completely.

  • The Compactor Cushion Rule: After sweeping your polymeric sand into the joints, you must run your mechanical plate compactor over the top of the pavers one final time to vibrate the sand all the way down into the base crevices. However, if you run a bare metal compactor plate directly across decorative clay or concrete pavers, it will leave ugly, permanent scrape marks across your stone faces. Always strap a thick neoprene or polyurethane compactor pad to the bottom of the machine to protect your investment.

Conclusion: Claim Your Outdoor Living Freedom

Taking control of your backyard infrastructure with a premium, interlocking paver patio system is one of the smartest, highest-value upgrades a homeowner can achieve. By respecting the physics of a flexible segmented base, laying down a robust crushed aggregate foundation, and securing your outer border with heavy-duty edge restraints, you effectively engineer a custom luxury living space that dramatically expands your home’s usable footprint while adding serious, long-term asset value.

Are you getting ready to overhaul your backyard layout or replace an old, crumbling walkway this upcoming weekend? What specific patterns or stone styles are you currently imagining for your space? Let me know your project footprints or installation questions in the comments section below, and let’s get your stones perfectly set!

sunraysaunas.com All shapes and designs are manufactured to exacting standards. You don’t compromise on style; we never compromise on the quality or security. Our high security doors are certified and tested in German most famous Rossenheim laboratory high security doors We reinforced the walls and fitted high security doors to protect our customer and his antiques collection for an apartment in London. If you live where our engineers are not able to reach you, just guide us, and we will make and ship the door 4 you Durable and lasting, convenient to use. All our security doors are manufactured by especially precise programmed machines Amada, which can process metal with the precision of 0.1 mm, therefore, their construction is precisely accurate and straight. security doors One of the locks installed in security doors must be no lower than 5th security class and protected by a drilling resistant manganese plate. Both locks are installed in protective steel boxes, and a separate protective sleeve secures each pin.

Hardening Perimeter Safety: Strategic Visibility via Pathway Lights

Source:https://hornbeckgroup.com

It is midnight, the rain is pouring down, and you are rushing out to the curb to grab a stray trash bin that’s blowing away. You take two quick steps off your porch, miss the hidden edge of your concrete walkway, and twist your ankle violently into a muddy flowerbed. As you sit there in the dark, nursing a bruised ego and a sprained joint, you look down your pitch-black front yard. It’s a classic, dangerous vulnerability that I fix constantly.

In my ten-plus years of auditing residential properties for both curb appeal and security, I have found that homeowners spend a fortune on high-tech deadbolts and indoor security cameras, yet completely ignore their dark front walk. Leaving your home’s exterior walkways in the dark is an open invitation for accidental trips and unwanted trespassers.

Implementing a strategically designed network of pathway lights is the ultimate low-voltage home improvement upgrade. It transitions your front yard from a dark, treacherous hazard into an inviting, secure, and visually stunning architectural showcase. Let’s look at the lighting physics, wiring logistics, and design placements needed to master your exterior lighting system.

The Physics of Exterior Illumination: Human Vision and Lumens

When beginners think about adding outdoor lighting, they often assume they need the brightest bulbs available to blast away the dark. They buy massive floodlights that mimic industrial stadium lighting.

This is a massive mistake. Blasting your front walk with blinding, unshielded light actually creates deep, harsh shadows right next to the beam path, making it harder for the human eye to adjust to the dark surroundings.

The Contrast Equation

Our eyes are highly adaptable instruments, but they require consistency. If you walk out of a softly lit living room into a landscape broken up by ultra-bright glare and ink-black shadows, your pupils will constantly struggle to dilate properly, creating temporary blind spots along your path.

Analogi: The Stage Lighting Directives

Think of your front yard like a high-end theater stage. You don’t aim a blinding spotlight directly into the audience’s eyes; that would ruin the show and cause discomfort. Instead, you place low-profile, downward-facing footlights that highlight the actors’ walking paths while keeping the glare hidden. Well-engineered pathway lights do exactly that: they shield the bulb filament from your direct line of sight, casting a smooth, soft wash of light downward onto the ground where your feet actually move.

Selecting Your Core Equipment: Power Sources and Material Specs

When you explore the lighting center at your local home improvement center, you will be faced with two primary power systems. Choosing between them dictates your system’s long-term reliability and brightness consistency.

+-----------------------------------------------------------------------+
|                    PATHWAY LIGHTING POWER SYSTEMS                     |
+---------------------------+-------------------------------------------+
| Solar-Powered Stakes      | Zero wiring required, easy DIY stake-in,  |
|                           | but dim and highly dependent on sunlight  |
+---------------------------+-------------------------------------------+
| Low-Voltage LED (12V)     | Consistently bright, weatherproof, links  |
|                           | to a central transformer, lasts decades   |
+---------------------------+-------------------------------------------+

1. The Solar Dilemma

Solar-powered fixtures are incredibly popular because they require zero technical skill to install—you simply push the plastic stake into the dirt. However, as an expert who has serviced these systems across seasons, I rarely recommend them as primary safety assets. They fade rapidly within 2 to 3 hours after sunset, lose performance during cloudy winter months, and the cheap internal rechargeable batteries degrade quickly from frost.

2. The Low-Voltage LED Gold Standard

For genuine perimeter safety, you want a hardwired low-voltage (12V) LED system. This network plugs directly into a standard 120V exterior outlet via a step-down magnetic or electronic transformer.

  • The Safety Profile: Operating at just 12 volts means the current is completely safe for children and pets, even if a lawnmower accidentally cuts the cable open.

  • The Efficiency Win: Modern LED fixtures require mere fractions of a watt compared to old incandescent bulbs, allowing you to run an entire 10-light path loop on less than 30 total watts of electricity.

Strategic Architecture: The Art of the Zig-Zag Pattern

Another common amateur mistake is arranging pathway lights in perfectly straight, opposing pairs down both sides of a walkway, like an airport runway. Not only does this look incredibly rigid and institutional, but it also creates optical illusions that distort your perception of depth.

          [ THE WRONG WAY: Runway Style ]
          ( o )   ( o )   ( o )   ( o )
          ============================= <-- Concrete Path
          ( o )   ( o )   ( o )   ( o )

          [ THE RIGHT WAY: The Professional Zig-Zag ]
          ( o )           ( o )
          ============================= <-- Concrete Path
                  ( o )           ( o )

To create a visually interesting, high-efficiency path, always utilize a staggered zig-zag configuration. Place your first light on the left side at the start of your walkway, move down roughly 6 to 8 feet, and place your secondary light on the right side.

This alternating pattern allows the overlapping pools of light to guide the human foot naturally down the walkway without over-illuminating the terrain. It uses fewer fixtures, saves power, and accentuates the organic textures of your nearby landscaping beds.

Step-by-Step Blueprint for a Flawless Low-Voltage Install

Ready to build a reliable, professional-grade landscape loop? Grab your tools and follow this clear engineering workflow:

  1. Map Your Fixtures: Lay your pathway lights flat on the ground exactly where you want them installed. Walk the path at night with a flashlight to verify spacing and coverage.

  2. Run the Low-Voltage Cable: Lay out a heavy-duty, UV-rated 12/2 or 14/2 landscape wire along the edge of the walkway. Leave roughly 12 inches of intentional slack at each light node to allow for natural ground settling and plant growth shifts over time.

  3. Bury the Line: Use a flat trenching shovel to slice a narrow 3-to-6-inch deep path into the turf right along your flowerbed borders. Push the cable down into the trench slot; because it is low-voltage, you do not need to run it through rigid PVC conduit pipe.

  4. Link the Connectors: Use high-quality, silicone-filled outdoor wire nuts or pierce-style pressure click-connectors to join each fixture’s lead line directly to your main trunk line. The silicone gel keeps moisture completely out of the copper strands, preventing corrosion.

  5. Program the Transformer: Connect the home run line to your outdoor transformer. Set the integrated photocell timer to automatically turn the loop on at dusk and off at dawn for seamless, automated home perimeter defense.

The Structural Mistakes that Blindside Homeowners

The Voltage Drop Phenomenon

When running a long linear line of low-voltage lights (especially loops exceeding 100 feet), you will often notice that the fixtures farthest away from the transformer look significantly dimmer than the ones closest to the house. This technical failure is known as voltage drop. As electricity travels down a copper cable, resistance saps the energy. To prevent this, use thick 12-gauge wire instead of thin 16-gauge, or use a multi-tap transformer, connecting your far-end lines to a 13V or 14V terminal block to equalize the power distribution perfectly.

  • Mind the Trimmer Hazard: String trimmers (weed whackers) will easily shatter cheap plastic lighting stems or sever exposed power lines instantly. Always select fixtures crafted from heavy-duty die-cast aluminum or solid brass, and ensure your power connections are tucked safely beneath a layer of protective bark mulch.

  • Color Temperature Selection: When buying your replacement LED bulbs or integrated fixtures, check the Kelvin (K) rating on the packaging. For a warm, inviting residential look, stick strictly to 2700K to 3000K (Warm White). Avoid 5000K (Daylight) bulbs, as they emit a harsh, blue-tinted light that makes your home look like a commercial parking lot or a cold hospital wing.

Conclusion: Illuminate Your Domain

Taking proactive control of your landscape’s security with a premium network of pathway lights is a rewarding home improvement project. By understanding the dynamics of low-voltage circuitry, avoiding the airport-runway placement trap, and protecting your lines from moisture with silicone-filled connectors, you build a dependable, beautiful shield that safeguards your family and enhances your property’s value for years to come.

Are you preparing to overhaul your front yard or back garden path with outdoor lighting this weekend? What specific challenges are you trying to solve with your layout? Let me know your project details or equipment questions in the comments section below, and let’s get your walkways safely lit!

Optimizing Recreational Logistics: Systematic Organization with the Bike Rack

Source:https://sarisinfrastructure.com

You are already running late for a Saturday morning group ride. You hurry into the garage, grab your high-end road bike, and pull. Instantly, a chaotic domino effect ripples through the dark corner: the handlebars hook into your spouse’s commuter bike, which twists and knocks over a stack of heavy plastic storage bins, sending a cascade of loose sports gear across your concrete floor. By the time you untangle the metal mess, your knuckles are scraped, your bike’s derailleur is slightly misaligned, and you’ve completely missed the meetup.

In my ten-plus years of designing high-efficiency residential storage layouts, I have learned that bicycles are the ultimate spatial bullies. Left to themselves, they don’t lean; they take over, consuming precious footprint square footage and turning functional garages into unnavigable obstacle courses.

The fix isn’t complicated or expensive. Integrating a strategically chosen bike rack system is a calculated move in home logistics. It transitions your recreation gear from an unorganized pile into a streamlined, high-access storage asset. Let’s dive deep into the mechanical configurations, weight-bearing physics, and real-world trade secrets needed to master your bike storage infrastructure.

The Spatial Equation: Why Horizontal Storage Fails Your Floor

When homeowners complain about a cramped garage, they almost always point the finger at their vehicles or bulky lawn equipment. But if you measure the true physical footprint of three adult bicycles leaning haphazardly against a wall, you’ll find they occupy roughly the same usable floor space as a compact sedan.

The Footprint Problem

Bicycles are inherently unstable three-dimensional shapes. Because their handlebars protrude at right angles to their frames, storing them side-by-side on their kickstands requires an immense amount of horizontal buffer space to prevent component tangles.

Analogi: The Filing Cabinet Efficiency

Think of your garage or utility room like a digital office. If you print out hundreds of important documents and spread them out flat across your desk, you will run out of working room within ten minutes. To solve this, you use a vertical filing cabinet, sliding those documents into neat, upright folders. Installing an engineered bike rack behaves exactly like that filing cabinet. It rotates or elevates the physical asset, converting dead vertical space into prime organizational real estate.

Selecting Your Rig: Deciphering the Bike Rack Hierarchy

Walk down the organizational aisle of any major home improvement center, and the selection can be overwhelming. To keep your logistics project simple, I categorize these systems into three core mechanical designs based on how they interact with your home’s structural envelope.

+-----------------------------------------------------------------------+
|                       BIKE RACK STORAGE MATRIX                        |
+---------------------------+-------------------------------------------+
| Wall-Mounted Vertical     | Maximizes floor space, micro-footprint,   |
| (Wheel-Hook)              | requires lifting the front tire           |
+---------------------------+-------------------------------------------+
| Wall-Mounted Horizontal   | Showcases the frame like art, zero tire   |
| (Frame-Cradle)            | wall contact, but uses wider wall space   |
+---------------------------+-------------------------------------------+
| Freestanding Floor Track  | Zero wall drilling required, ultra-easy   |
|                           | access, best for kids and heavy e-bikes   |
+---------------------------+-------------------------------------------+

1. Wall-Mounted Vertical Hooks

This is the ultimate space-saving champion for compact single-car or two-car garages. These racks feature a heavy-duty steel hook that cradles your front tire, allowing the bicycle to hang perfectly perpendicular to the ceiling line.

  • The Spatial Win: By hanging bikes vertically, you can easily pack four bicycles into the same wall width that a single bicycle would occupy when parked horizontally.

  • The Hinge Variant: Look for vertical racks that feature a built-in mechanical hinge. This allows you to swing the hanging bikes flat against the wall like pages in a book, compressing the storage profile even further.

2. Wall-Mounted Horizontal Cradles

If you own a beautiful carbon-fiber racing machine or a vintage steel cruiser, you might want to treat it like architectural art. Horizontal racks utilize padded dual-arms that cradle the bicycle’s top tube. This setup keeps the tires completely off your drywall, preserving your paint job while keeping the bike ready to grab at waist height.

3. Freestanding Floor Tracks

If you are renting your property or dealing with brittle masonry walls where drilling is prohibited, a freestanding floor track or gravity tower is your clear path forward. These standalone metal racks feature stabilization slots that capture the rear or front tire securely, stopping the bike from tilting without requiring permanent structural fasteners.

Technical Specifications: Anchoring Against Mechanical Leverage

In my decade of site work, I have repaired dozens of collapsed drywall segments because an enthusiastic DIYer tried to hang a heavy mountain bike using simple plastic drywall anchors. This is a severe calculation error that ignores basic physics.

The Physics of Pull-Out Force

When you hang a 30-pound bicycle on a hook that extends 6 inches out from a wall, that bike isn’t just pulling straight down due to gravity. It is exerting rotational leverage (torque) that actively tries to pry the top screws straight out of the wall board.

            [ WALL DRYWALL LINE ]
         ===========================
           |   | <-- 2.5" Lag Screw (Must hit timber center)
           |   |
         [==]=======[ STEEL HOOK ]
           ||             |
           ||             v (Rotational Leverage Pulling Outward)
         [RACK]
           ||
           v (30+ lbs Gravity Deadweight)

Finding the Meat of the Frame

To guarantee absolute asset protection, your bike rack brackets must be anchored directly into the structural center of your home’s wood wall studs or concrete block substrate.

  • Wood Stud Construction: Use a high-end deep-scanning stud finder to locate the solid timber framing edges. Pre-drill a pilot hole using a bit slightly smaller than your fastener, and secure the rack using heavy-duty, 2.5-inch structural lag screws.

  • Masonry/Concrete Walls: Drill your pilot holes using a specialized carbide-tipped masonry bit and a hammer drill. Drive your mounting hardware into heavy-duty sleeve anchors or Tapcon concrete screws.

Step-by-Step Blueprint for a Seamless Installation

Ready to reclaim your floor space? Grab your safety gear, clear out your working lane, and execute this straightforward building sequence:

  1. Inventory Your Fleet: Measure the widest set of handlebars in your family collection (usually the mountain bikes). This dimension dictates how much clearance distance you need between your vertical wall hooks to prevent the grips from smashing into each other.

  2. Establish Your Vertical Height: If opting for a vertical hook rack, hold your bike upright on its rear wheel against the wall. Mark the exact height where the front rim meets the wall, and mount your hook bracket 2 to 3 inches above that mark to ensure the rear tire floats slightly off the floor line.

  3. Deploy a Tire Defense Pad: Continuous tire contact will leave ugly, black rubber scuff marks on your walls over time. Mount small, adhesive-backed plastic or metal tire plates directly where the front and rear rubber treads meet your drywall.

  4. Confirm Alignment: Before tightening your structural lag screws completely down, use a torpedo level to ensure your multi-bike track system is perfectly level across the horizon line.

The Pitfalls the Packaging Won’t Tell You

The Hydraulic Brake Air Trapping Phenomenon

Many modern mountain bikes and high-end gravel bikes feature hydraulic disc brake systems. These systems rely on a sealed column of mineral oil or DOT fluid to actuate the brake calipers. If you store a hydraulic-equipped bicycle vertically or upside down on a bike rack for months at a time, any microscopic air bubbles present in the master fluid reservoir can migrate straight down into the brake lines. The next time you take the bike down for a ride, your brake levers will feel completely soft and sponge-like, destroying your stopping power until you manually bleed the lines. If your fleet features hydraulic brakes, always store them on a horizontal cradle or a traditional floor track to keep the reservoirs elevated.

  • Mind the Rim Depths: If you ride a modern aero road bike equipped with deep-section carbon fiber wheels, ensure the hook on your vertical bike rack is wide enough to clear the full depth of the rim without scratching or applying pinpoint crushing pressure to the fragile carbon weave. Look for hooks lined with thick, soft rubber or dense neoprene sleeves.

  • The E-Bike Weight Threshold: Electric bikes (e-bikes) are magnificent utility vehicles, but their heavy internal motors and battery packs push their total weight anywhere from 50 to 80 pounds. Never attempt to hang a heavy e-bike on a standard vertical wall hook unless you want to pull your lower back muscles out of alignment. Keep these heavy units grounded in an industrial-grade floor track system or utilize a mechanical ceiling hoist.

Conclusion: Take Ultimate Command of Your Space

Systematically organizing your home with a high-performance bike rack completely changes the daily functionality of your property. By moving away from chaotic, leaning clusters and investing in a structurally anchored vertical or horizontal setup, you eliminate component damage, preserve your home’s walls from rubber scuffs, and unlock pristine floor space for your vehicles and workshop projects.

Are you getting ready to overhaul your garage or basement layout to accommodate your family’s bicycles this season? What specific style of rack system fits your interior layout best, and what installation hurdles are you trying to solve? Let me know your project details or equipment questions in the comments section below, and let’s get your gear organized!

Advanced Security Integration: Implementing the Pet Friendly Sensor Protocol

Source:https://www.roombanker.com

It is 3:00 AM, and your phone is screaming. The home security app is flashing red: “Intrusion Detected: Living Room.” Your heart races as you grab a flashlight, only to find your 60-pound Golden Retriever, Cooper, staring at you sheepishly from the couch. He just wanted a midnight snack. This “false alarm fatigue” is the number one reason homeowners eventually disable their security systems entirely, leaving them truly vulnerable when it matters most.

In my twelve years of designing smart home infrastructures, I’ve seen more homeowners defeated by their own pets than by actual burglars. We want safety, but we also want our furry family members to roam free. Achieving this balance requires a shift from basic motion detection to a specialized Pet Friendly Sensor protocol. This isn’t just about turning down the sensitivity; it’s about understanding the physics of how a home “sees” movement.

The Infrared Filter: How Modern Sensors “Think”

To understand a Pet Friendly Sensor, you have to understand Passive Infrared (PIR) technology. These sensors don’t actually “look” at the room like a camera; they monitor changes in heat signatures. When a human walks by, they represent a large, vertical block of heat moving across the sensor’s field of view.

Think of it like a high-speed camera at a race track. A standard sensor is looking for any movement across the finish line. A pet-friendly version, however, is like a “height and weight” gate. It is programmed to ignore heat signatures that fall below a certain mass—typically 40 to 80 pounds—and stay within a specific distance from the floor.

The Weight Gap Delusion

Early in my career, I made the mistake of trusting the box. A client bought a sensor rated for “up to 50 lbs,” but their 20-pound cat kept triggering it. Why? Because the cat jumped on the back of the sofa, right in front of the lens. To the sensor, that cat looked like a 200-pound giant because it was so close. This taught me that a Pet Friendly Sensor is only as good as its placement strategy.

Engineering the Shield: Strategic Placement Protocols

When we implement a pet-immune system, we aren’t just slapping devices on a wall. We are creating a “Security Envelope.” Here is the mechanical workflow I use for every professional installation.

1. The “Dead Zone” Calibration

A professional Pet Friendly Sensor often utilizes a “Look Down” creep zone. However, for pet owners, we actually want to disable this. We aim to create a horizontal “blind spot” from the floor up to about 3 or 4 feet.

Pro Tip: Mount your sensors at exactly 7.5 feet. This height allows the PIR beams to fan out over the heads of your dogs while still capturing the midsection of any upright human intruder.

2. Dual-Technology Integration (PIR + Microwave)

If you have a particularly active pet—like a bird that flies or a cat that climbs—a single PIR sensor won’t cut it. I always recommend “Dual-Tech” sensors. These require both an infrared heat change and a microwave pulse (which detects physical mass displacement) to trigger the alarm. This drastically reduces false positives from heat vents or small pets.

3. Masking and Fresnel Lens Adjustments

Some high-end sensors allow you to physically “mask” certain zones. If you know your cat spends all day on a specific bookshelf, we can apply an internal mask to the lens that essentially blinds the sensor to that specific square foot of space without compromising the rest of the room.

Technical LSI Vocabulary: Mastering the Spec Sheet

Before you purchase your next Pet Friendly Sensor, look for these technical specifications to ensure you are getting more than just a marketing label:

  • Animal Immunity Level: Usually measured in kilograms or pounds (e.g., 20kg/40lb or 40kg/80lb).

  • Pulse Count Logic: This determines how many “steps” a heat signature must take across the beams before the alarm triggers. Higher pulse counts are better for homes with high pet activity.

  • Temperature Compensation: This ensures the sensor remains accurate when the room temperature is close to human body temperature (98.6°F), preventing “thermal blindness.”

  • RFI/EMI Protection: High-quality sensors are shielded against Radio Frequency Interference, which can be caused by your Wi-Fi router or microwave.

Expert Advice: The “Climber” Warning

Here is an insight that caught me off guard during a renovation project in 2018: Thermal mass is cumulative.

If you have three 15-pound dogs playing together, their combined heat signature can exceed the 40-pound limit of your Pet Friendly Sensor. If they huddle together or chase each other in a tight circle, the sensor sees one “large” heat source.

Expert Advice: If you have multiple pets, always “over-spec” your sensors. If your dogs total 45 pounds combined, buy an 80-pound rated sensor. It’s better to have a higher threshold than to deal with a false alarm at 3:00 AM.

Never point a motion sensor directly at a window or a heat vent. For a pet-friendly setup, the sun hitting a rug or a blast of hot air from the floor vent can mimic the movement of a living creature, causing the system to trip even if your pets are asleep.

The Analogy: The Security Bouncer

Think of a standard motion sensor like a bouncer who kicks out anyone wearing a red shirt. If your dog has a red collar, he’s out.

A Pet Friendly Sensor is like a bouncer with a guest list and a height chart. He says, “Okay, if you’re under 3 feet tall and don’t weigh much, you’re clearly not the guy I’m looking for. You can stay.” By adding Dual-Tech (Microwave), you’re giving that bouncer a second set of eyes to confirm that the person in the red shirt is also a human-sized mass before taking action.

Maintaining the Infrastructure

A security system is “set and forget” until it fails. To maintain Advanced Security Integration, you must perform a “Walk Test” every six months.

  1. Put your system in “Test Mode.”

  2. Let your pets roam the room as they normally would.

  3. Walk through the room yourself in an upright position.

  4. Check the log: Did it ignore the pets? Did it catch you?

If the sensor is missing you, or catching the pets, you need to adjust the Sensitivity Jumper located inside the sensor housing. Most professional units have a small pin or switch that allows you to toggle between “High,” “Medium,” and “Low” pet immunity.

Conclusion: Peace of Mind for the Whole Family

Integrating a Pet Friendly Sensor protocol isn’t about compromising your home’s security; it’s about refining it. When you eliminate false alarms, you restore your trust in the system. When that alarm goes off, you’ll know it’s because of a real threat, not because Cooper decided to jump on the sofa.

Does your current security system “overreact” to your pets? Or have you found a specific mounting trick that finally silenced the false alarms? Drop a comment below—I’d love to hear your experiences with balancing home tech and pet life!

Elevating Your Workspace: The Benefits of Professional Commercial Upholstery in Denver

A well-maintained commercial space communicates professionalism the moment a client or employee walks through the door. While architectural design and wall art often receive the most attention, the furniture—specifically its condition—serves as the true anchor of a room’s aesthetic. Over time, high-traffic areas inevitably suffer from fabric fatigue, cushioning compression, and structural wear. For businesses across the Mile High City, investing in commercial upholstery in Denver is not merely a cosmetic fix; it is a strategic decision to extend the life of high-quality assets and maintain a polished brand image.

Understanding the Lifecycle of Professional Furniture

Commercial environments subject furniture to stress levels that residential pieces never encounter. Conference room chairs, lobby sofas, and restaurant booths undergo thousands of hours of use, leading to inevitable material degradation. When the fabric begins to fray or the internal foam loses its rebound, the piece begins to detract from the professional atmosphere of the office.

Many businesses mistakenly view these signs of wear as a signal to replace their inventory entirely. However, high-quality professional furniture is often built with robust frames that are designed to last for decades. By opting for professional refurbishment, companies can restore these foundations to their original factory standards, often using performance-grade textiles that offer better stain resistance and durability than the original coverings. Choosing to restore existing furniture is also a more sustainable approach, significantly reducing the amount of waste sent to local landfills.

The Strategic Advantage of High-Performance Textiles

When selecting materials for commercial upholstery in Denver, the choice of fabric is paramount. Unlike residential settings, commercial spaces require materials that meet rigorous industry standards for abrasion resistance, fire safety, and colorfastness.

A professional upholsterer will prioritize fabrics classified for heavy-duty commercial use. These textiles often feature:

  • High Double-Rub Counts: This measurement indicates how many times a fabric can be abraded before the threads break. Commercial-grade fabrics are tested to withstand over 100,000 double rubs.
  • Antimicrobial and Soil-Resistant Treatments: Given the high volume of foot traffic in Denver offices and hospitality venues, fabrics treated to repel moisture and inhibit bacterial growth are essential for maintaining hygiene.
  • UV Resistance: Even in interior settings, consistent exposure to the intense Colorado sun can lead to fading. Selecting UV-rated materials ensures that your lobby or lounge areas retain their vibrant color for years.

Refreshing Your Space: The Shift Toward Modern Aesthetics

Sometimes, a business does not necessarily need a repair; it needs a visual evolution. As design trends shift toward cleaner lines, more sustainable materials, and bolder color palettes, older furniture can make a workspace feel dated. Rather than investing in entirely new upholstered furniture in Denver, companies are increasingly choosing to reupholster existing pieces to align with updated branding or interior design schemes.

This process allows for complete customization. You can transform a heavy, traditional executive chair into a sleek, modern piece by selecting a high-performance leather or a textured weave that complements a contemporary office aesthetic. This level of customization is rarely available with mass-produced furniture, providing a unique opportunity to create a cohesive look that reflects the specific culture and identity of your company.

Technical Considerations for Commercial Restoration

A professional upholstery project involves more than just swapping out fabric. It requires a deep understanding of the internal components that make a piece of furniture comfortable and functional.

Cushion Engineering

Compression of the seat foam is often the primary reason furniture feels “worn out,” even if the fabric is pristine. Professional services utilize high-density polyurethane foam or memory foam inserts that provide the necessary support for long meetings or extended lobby waits. Choosing the right density ensures that the furniture maintains its profile and comfort level without sagging over time.

Structural Integrity Inspections

During the reupholstery process, the piece should be completely stripped to its frame. This presents a critical opportunity to inspect the joints, webbing, and springs. In Denver’s dry climate, wood frames can occasionally become brittle or develop loose joints. A thorough restoration addresses these underlying structural issues, ensuring the piece is as sturdy as it is beautiful.

Ergonomic Compliance

For office environments, the ergonomics of seating are non-negotiable. Reupholstering task chairs requires specialized knowledge to ensure that the fabric tension does not interfere with adjustable height, tilt, or lumbar support mechanisms. Professional installers are trained to work around these intricate mechanical parts, ensuring that the furniture remains fully functional and compliant with workplace safety standards post-restoration.

Maintaining Your Investment

Once you have completed a project for commercial upholstery in Denver, implementing a maintenance schedule is essential to maximize the return on your investment. Commercial furniture thrives on routine care.

  1. Scheduled Vacuuming: Dust and grit act as abrasives that break down fibers over time. Weekly vacuuming with a soft-brush attachment prevents these particles from settling into the weave.
  2. Spot Cleaning Protocols: Have a clear plan for liquid spills. Many commercial fabrics are treated for spill resistance, but prompt action with the appropriate cleaning agent is still necessary to prevent permanent staining.
  3. Rotation: If certain chairs receive significantly more use than others, rotating their positions periodically can help ensure even wear across your entire inventory.
  4. Professional Deep Cleaning: Much like carpets, upholstered furniture benefits from an annual deep cleaning by professionals who utilize hot-water extraction or dry-cleaning methods suitable for commercial textiles.

The Long-Term Value of Quality Restoration

Deciding between buying new or refurbishing depends largely on the quality of the current frame. If the frame is made of solid hardwood with high-quality joinery, it is almost always more cost-effective and aesthetically superior to reupholster. When businesses look for new upholstered furniture in Denver, they often encounter long lead times and supply chain delays. Professional reupholstery, by contrast, is often faster and offers a greater degree of flexibility regarding fabric choice and custom finishing details.

By prioritizing the maintenance and aesthetic refreshment of your current inventory, you demonstrate a commitment to both operational efficiency and environmental responsibility. Whether you are aiming to modernize a boardroom, revive a reception area, or upgrade the seating in a breakroom, partnering with skilled professionals ensures that your furniture continues to serve its purpose with both comfort and style.

Ultimately, the atmosphere of your commercial space is a silent ambassador for your business. By keeping your seating in peak condition, you provide a subtle but powerful message that your company values quality, attention to detail, and the comfort of everyone who steps through your doors.